
Polka dots shouldn’t still feel new. They’re old. Your grandma wore them on a headscarf, probably. And yet here we are in 2026, and dots are back on nails in a way that feels oddly fresh.
Why? I think it comes down to how forgiving they are. Dots don’t care if your hand is shaky. They don’t demand perfect lines or a steady wrist at midnight.
A dotting tool, a toothpick, even the end of a bobby pin, and you’re in business.
So what’s in this list? Thirty ideas, sorted by mix-and-match designs, classic, bold, barely-there, textured, and seasonal.
You’ll find designs you can finish in ten minutes on your couch, and a few that’ll make your nail tech smile (or sigh, depending on the day).
Each one comes with a quick note on colors, finish, or how to pull it off.
If you’re after something cute for Saturday brunch, something polished for the office, or something loud for a Fourth of July cookout, you’ll land on at least three favorites here.
Maybe more. Read on, and screenshot freely.
30 Polka Dot Nails Ideas
Dots Meet Other Designs
Dots get even better with a partner. Hearts, bows, cherries, checks: pair them with a polka dot and each one looks fresher than it would alone.
Think of this section as the “mix and match” drawer of your nail kit.
1. Black Hearts and Dots on Sheer Pink
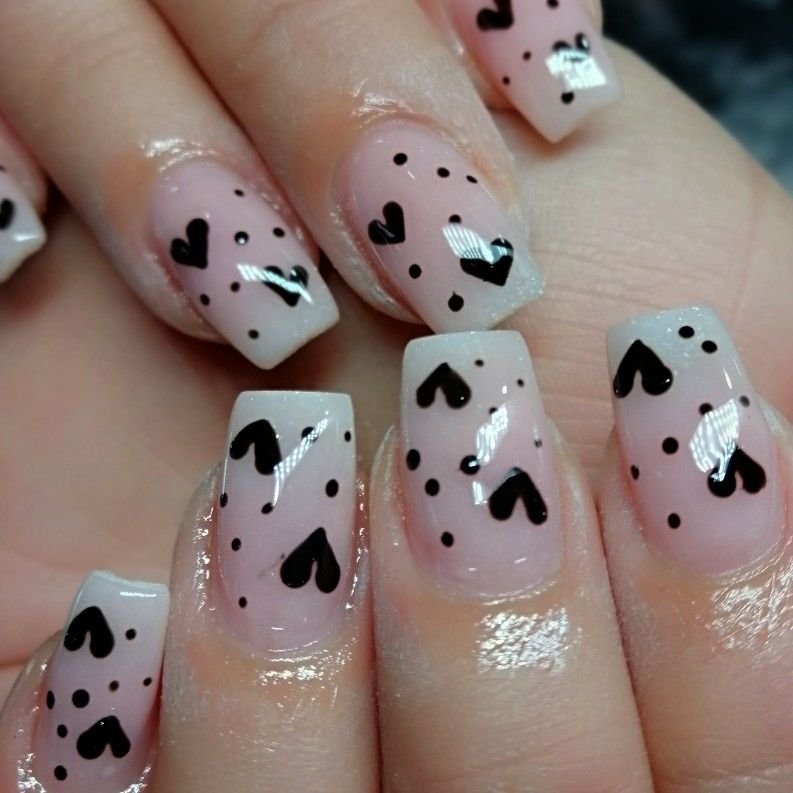
Hearts and dots, scattered like confetti after a party.
Start with a see-through pink base, then paint small black hearts in a few spots on each nail.
Fill the gaps with tiny dots of different sizes. Nothing needs to line up, and that’s what makes it fun.
The black keeps it edgy instead of sugary, and the sheer base lets your natural nail show through.
2. Checkerboard Accents with Black Dots
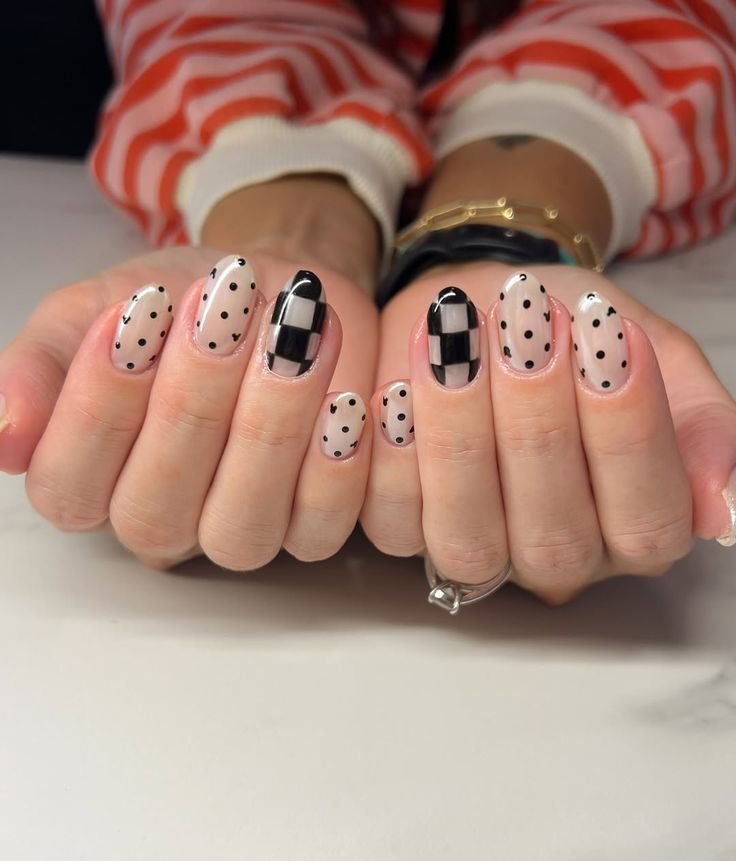
Two patterns, one palette. Start with a sheer, milky nude base and scatter small black dots over most of your nails.
Then pick one nail on each hand, usually the middle or ring finger, and paint a black checkerboard.
The grid is crisp and the dots are loose, and that push and pull is what makes it work.
3. Cherries and Dots on Red
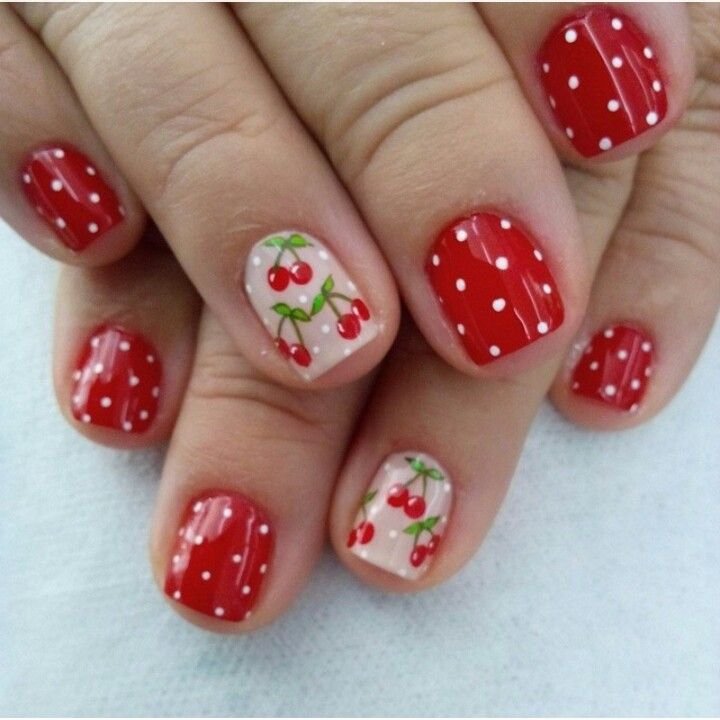
Red nails, white polka dots, and a little fruit stand.
Paint most nails in a glossy cherry red and dot them with small white dots, evenly spaced.
Then pick one or two accent nails with a sheer nude base and paint a pair of cherries with green stems and leaves, with a few tiny white dots floating around them.
It’s retro and playful, like a picnic blanket on your fingertips. Use a fine brush for the stems, and don’t sweat it if they come out a little crooked. Short, square nails make the cherries easy to fit.
4. Dots and Bows
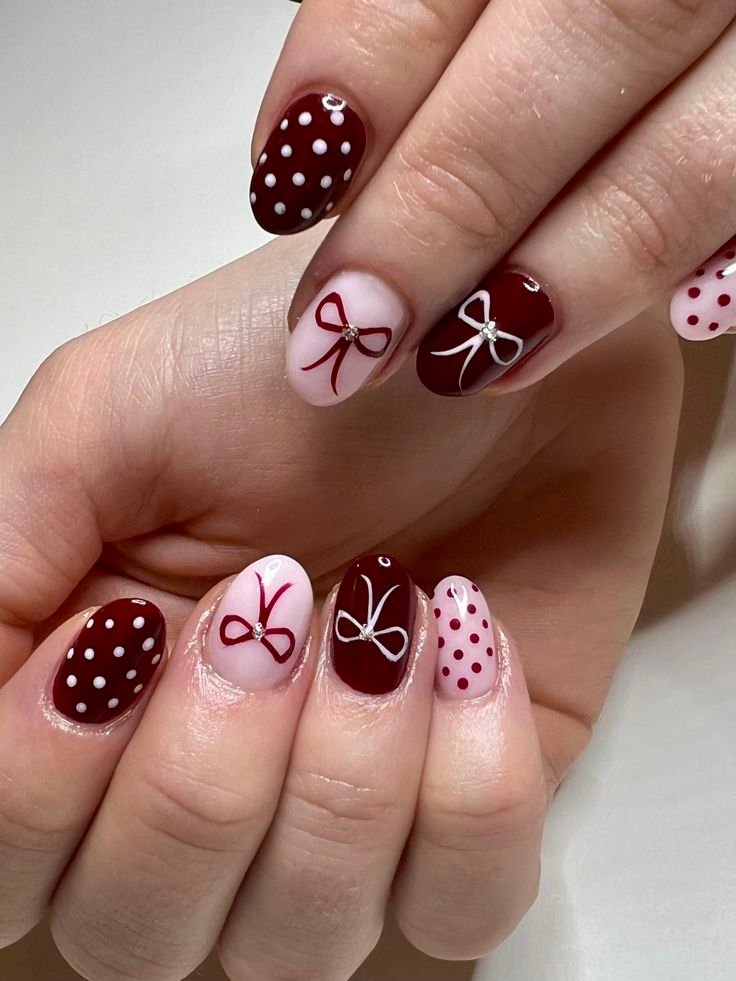
The coquette look, but moodier. Mix two bases: deep burgundy and a soft, milky pink.
On the burgundy nails, paint thin white bows with a tiny rhinestone dropped into each center.
On the pink ones, flip it and draw the bow in burgundy. Then add polka dots to a few nails, white on burgundy and burgundy on pink, so the patterns match without being identical.
The bows are just a few loose lines, so they’re forgiving. A fine brush and a steady breath do most of the work. Short ovals suit it well.
5. Daisies and Dots in Bright Colors
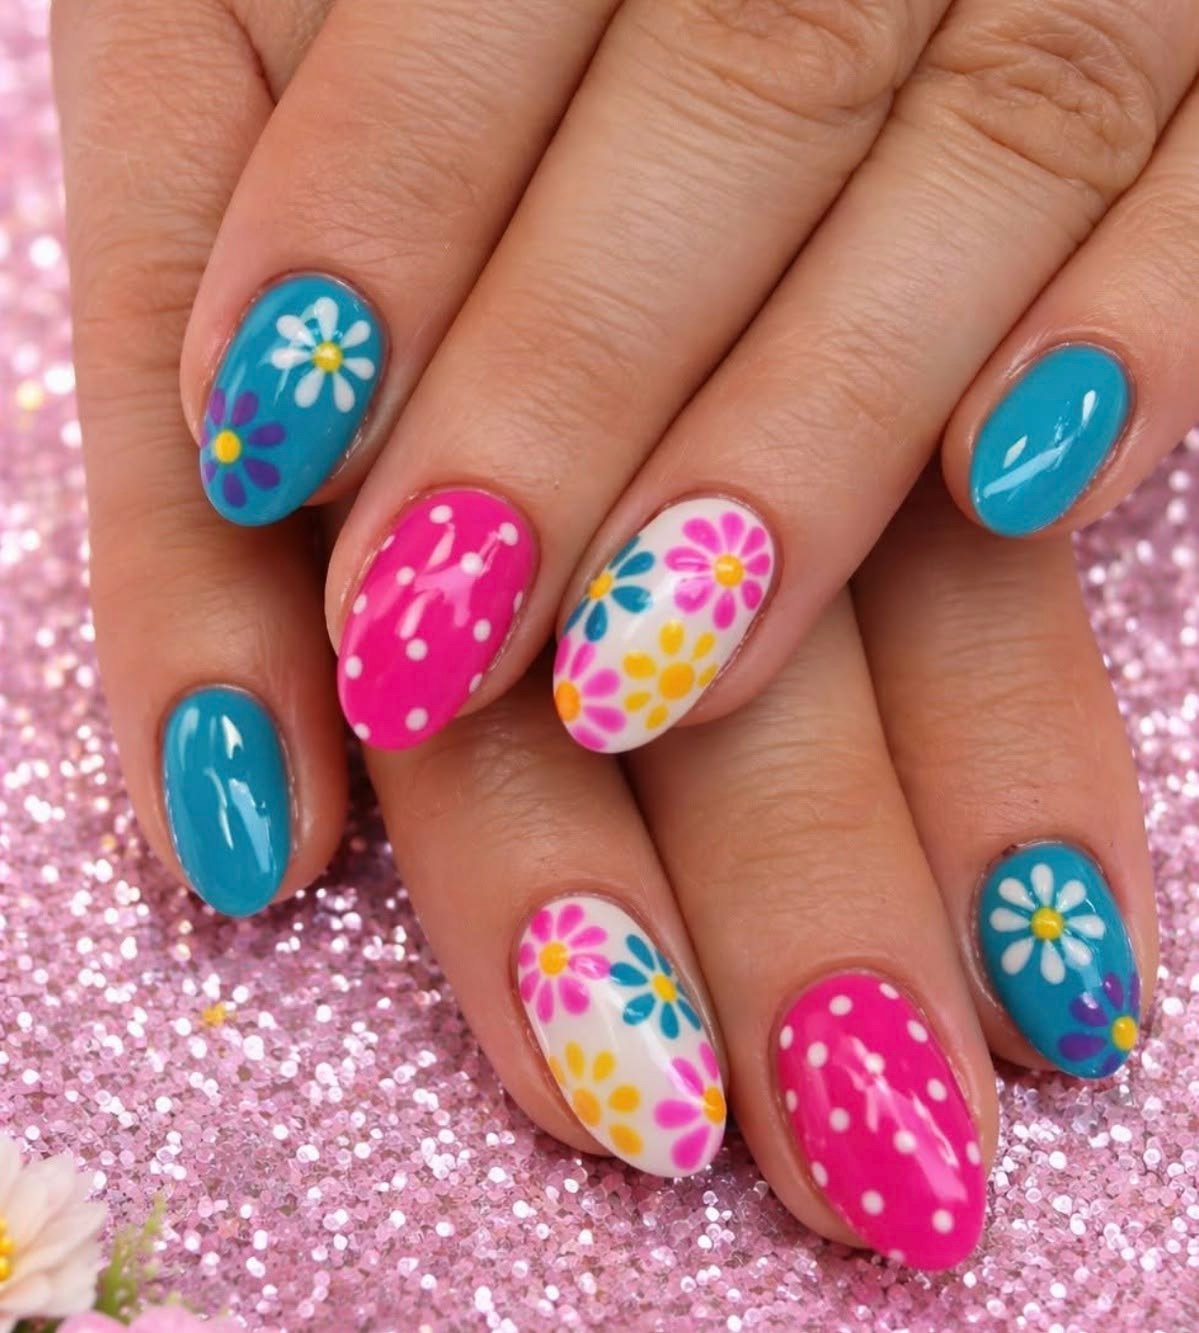
Think retro flower power with a candy palette. Mix three bases: glossy teal, hot pink, and crisp white.
Keep a couple of nails plain teal so the design can breathe. On the hot pink nails, add white polka dots.
Then paint simple daisies on the others, with white and purple petals on teal, and pink, yellow, and teal petals on white.
Each flower starts with one dot for the center, then you press petals around it with the dotting tool, so a dot becomes a flower.
6. Red Gingham with Dots and Puffy Daisies
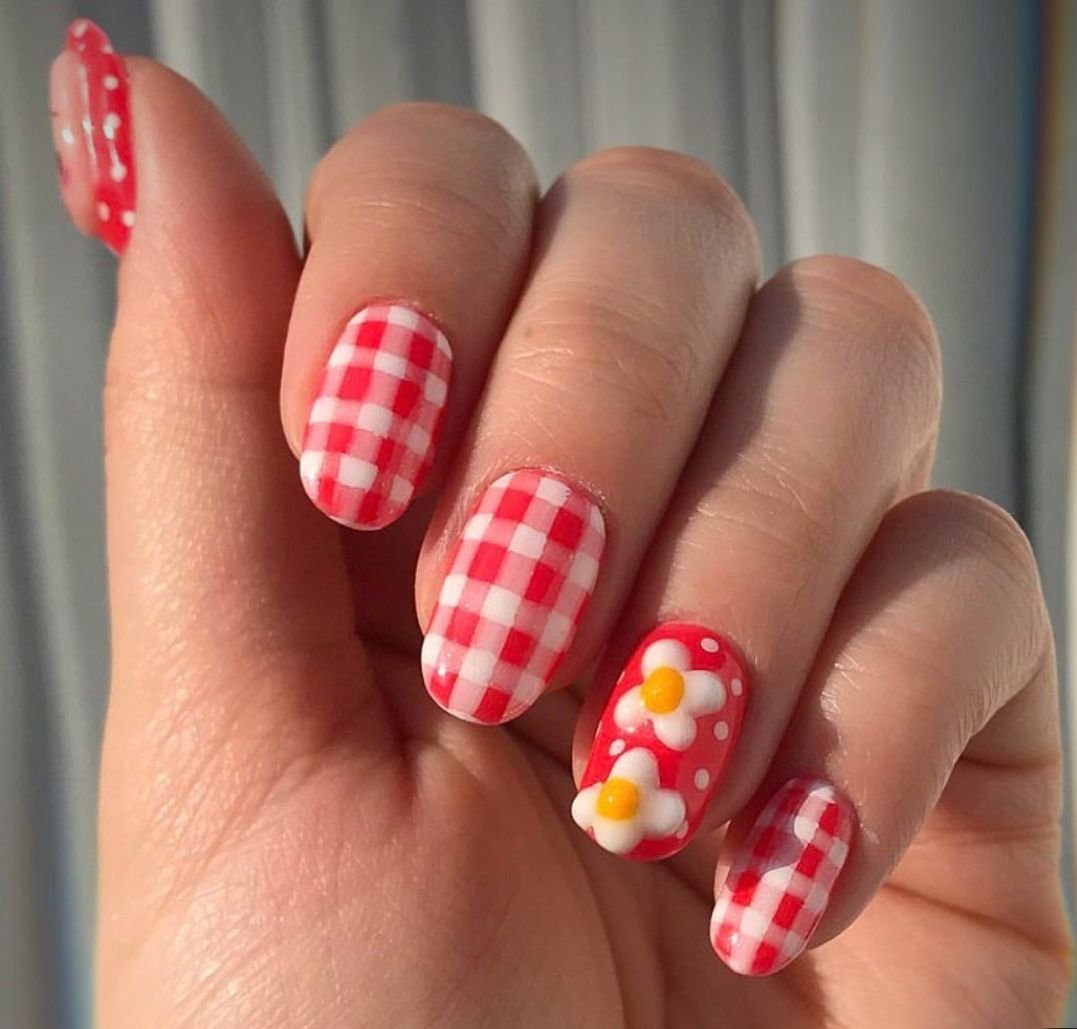
A picnic blanket on your fingertips. Paint three nails in red-and-white gingham: lay down a pale pink base, brush on wide red stripes in one direction, then cross them with more stripes the other way, so the overlaps turn a deeper red.
Keep the lines a little wobbly. The handmade look is the charm.
Then give the thumb and one accent nail a glossy red base with white polka dots, and top the accent nail with two puffy white flowers with bright yellow centers.
Build the petals with thick white gel, so they sit above the nail like tiny marshmallows. Short ovals suit it well.
Classic Dots, Updated
Not every dot has to shout. These are the familiar ones, the kind you’ve seen on a vintage dress, with a small twist in color, size, or finish so they feel current instead of costume-y.
They’re easy to wear, easy to copy, and kind to short nails.
7. Black Dots on Milky White
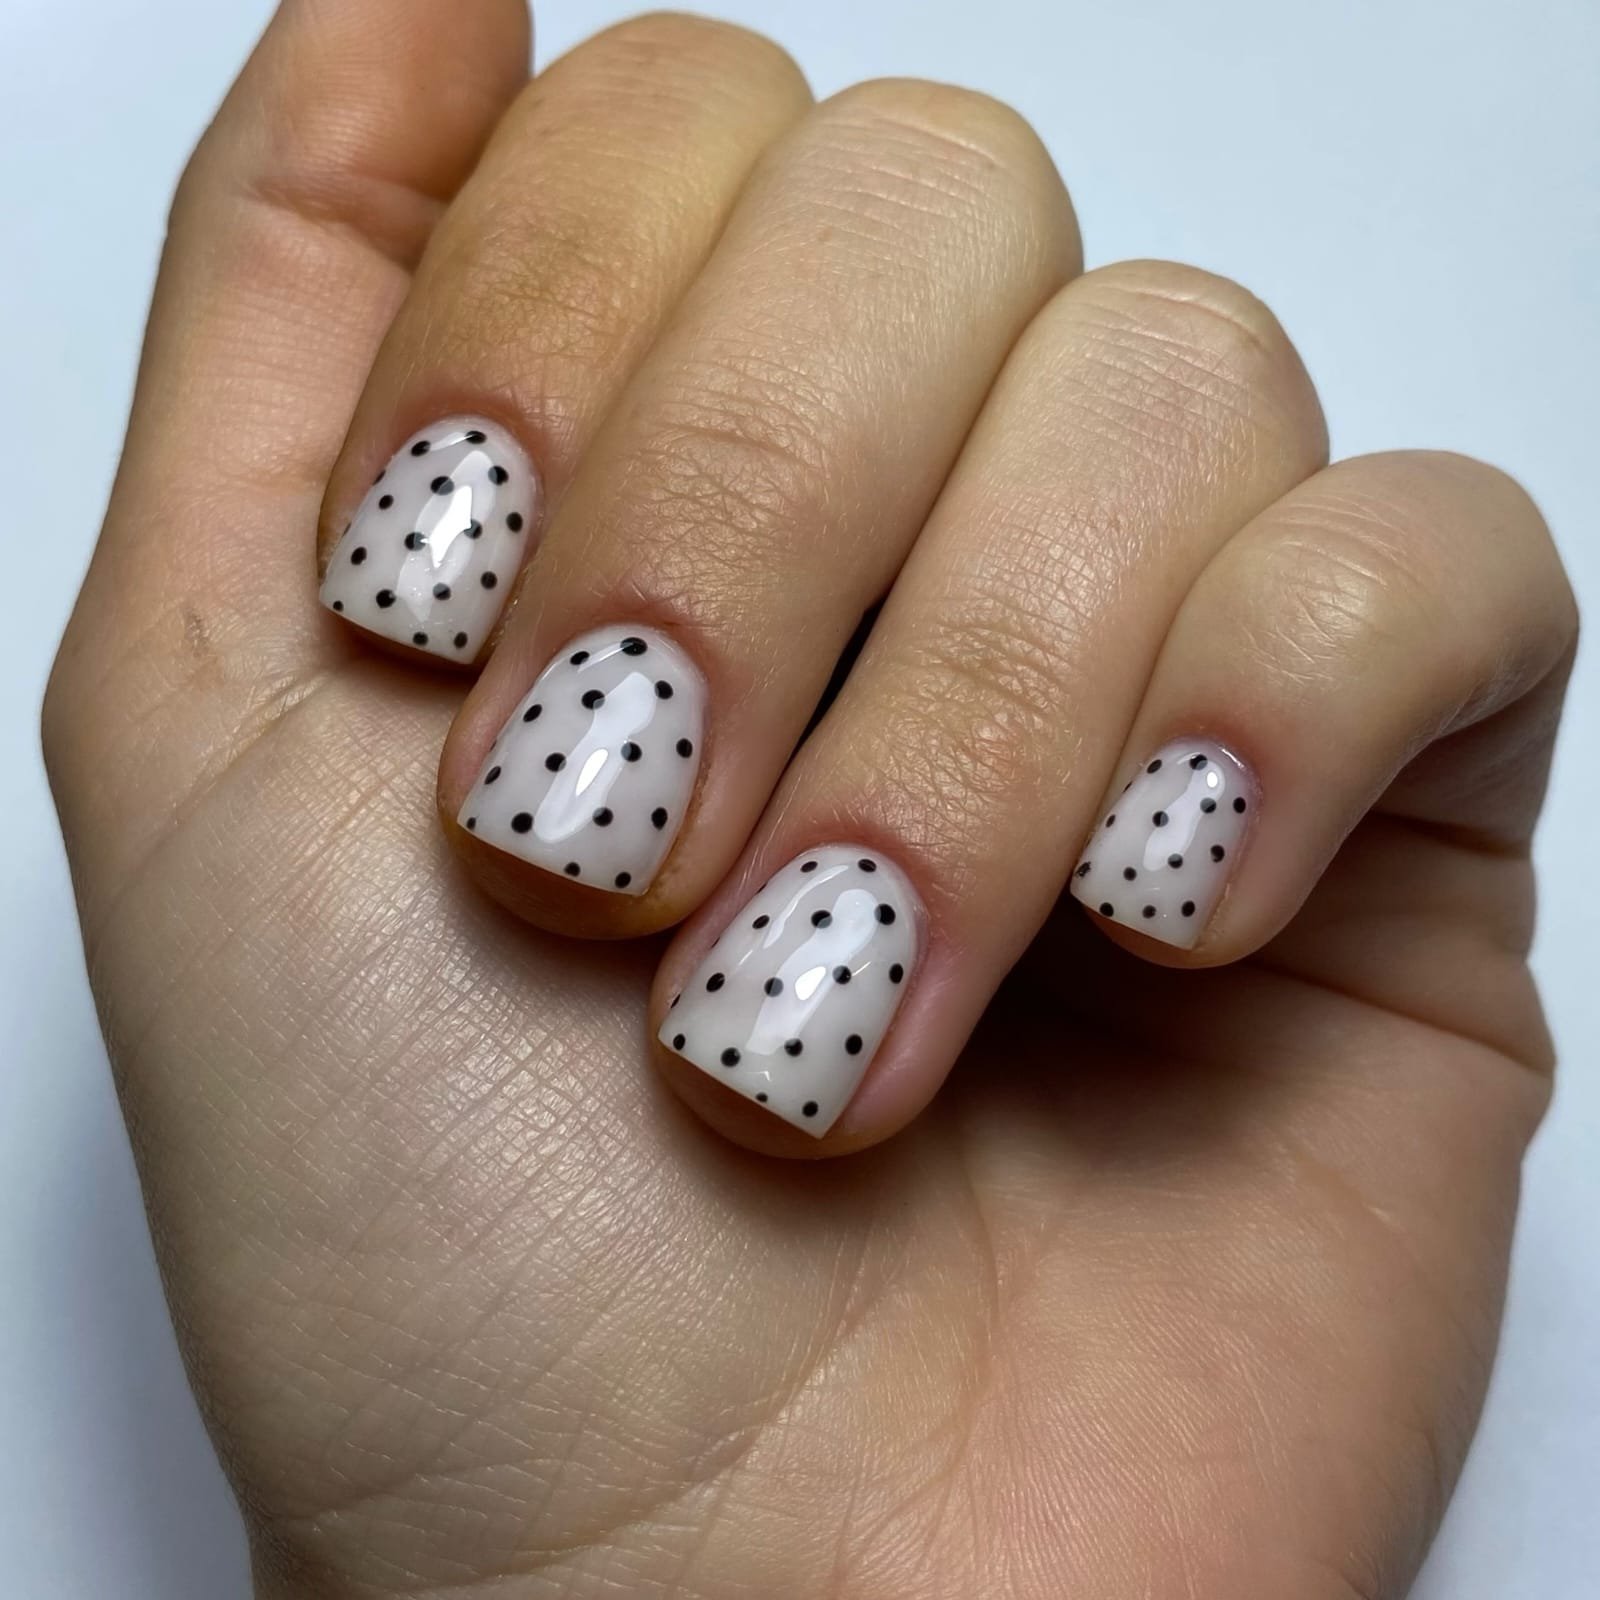
The original. A sheer milky base, small black dots scattered like someone sneezed pepper.
Simple. It works on short nails and long ones, and it goes with basically everything in your closet.
It’s also the best starter set if you’ve never picked up a dotting tool.
8. Burgundy Dots on Soft White
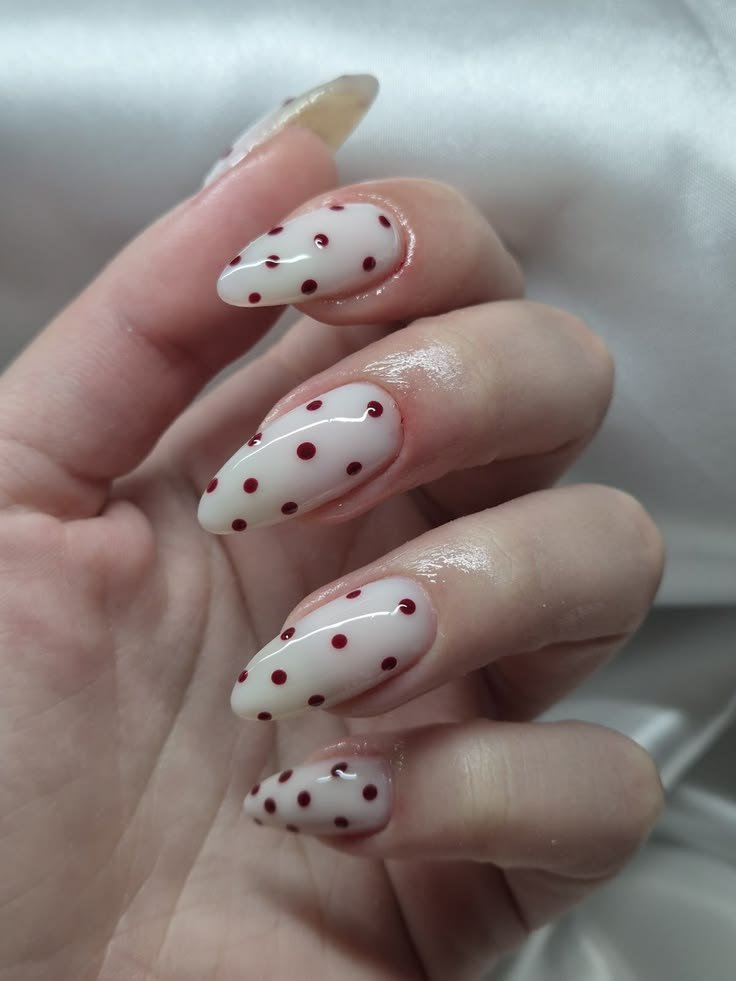
Deep wine-red dots over a soft, sheer white base. Think ripe cherries on a linen tablecloth.
Keep the dots small and evenly spaced, around six to eight per nail, with plenty of room to breathe.
The glossy finish does half the work here, and it looks especially good on almond shapes.
It’s cozy for fall, romantic for Valentine’s Day, and quiet enough for the office.
Add a glossy topcoat and a swipe of red lipstick, and the whole outfit gets a nudge.
9. White Dots on Navy
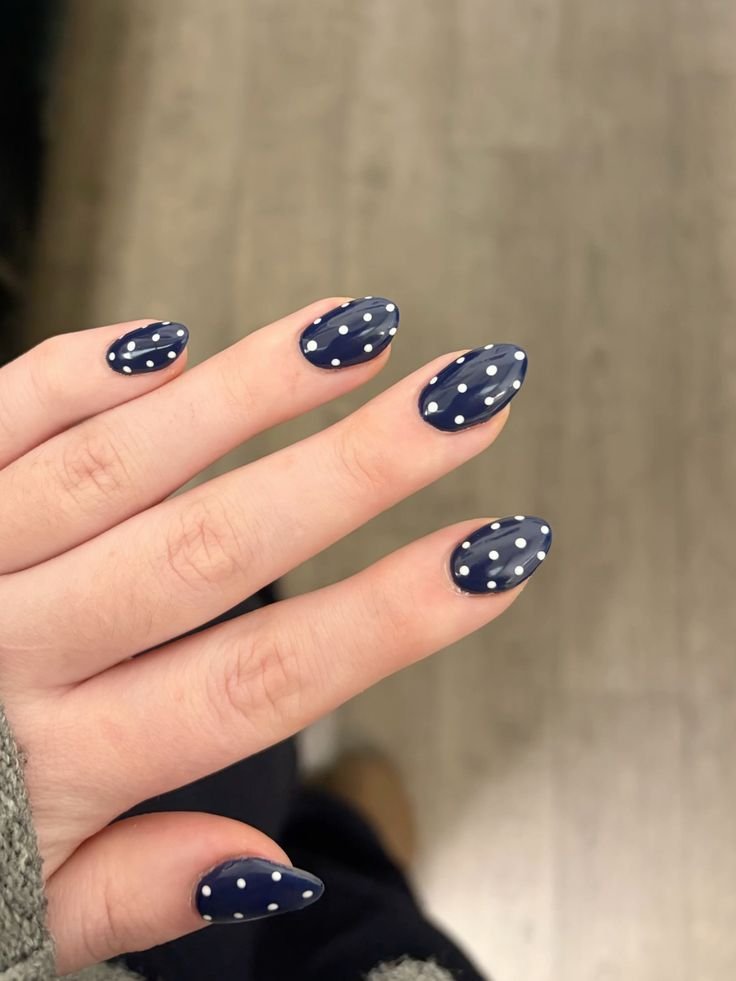
Deep navy, crisp white dots. It looks like a night sky had a very organized day.
This one’s a quiet favorite for office hands because navy reads serious, and the dots sneak in the fun.
Try this twist. Add one red dot per nail and it turns into a Fourth of July manicure without even trying.
10. Tonal Dots, Same Color Family
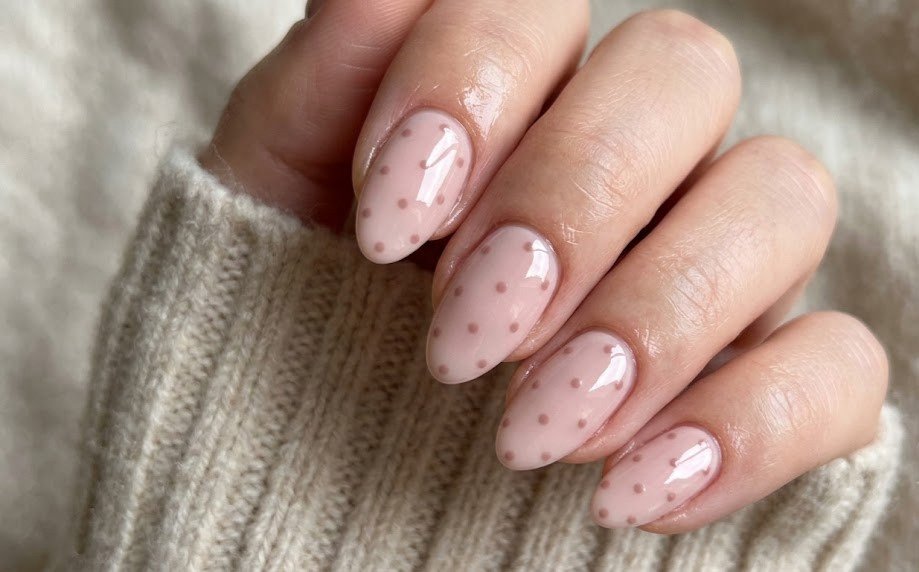
Pick one shade, then go a notch lighter or darker for the dots.
Dusty rose on blush, say. What I mean is, you see the pattern only when your hands move. Subtle. Kind of elegant.
It also photographs beautifully, because the soft contrast reads as texture instead of pattern.
11. Black Dots on Nude
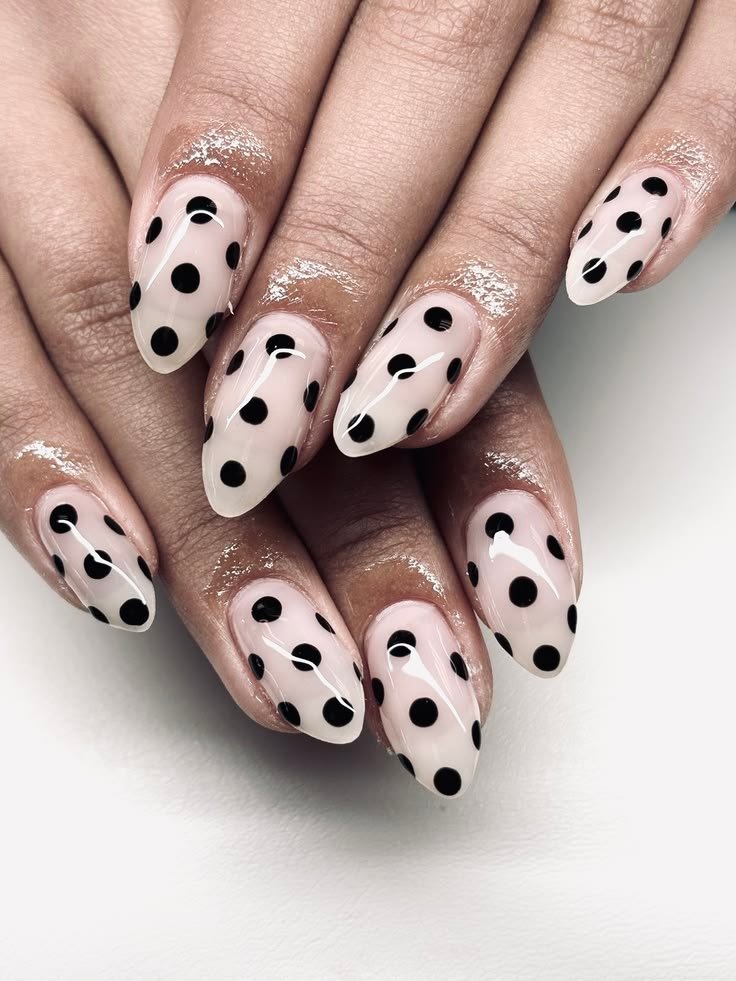
A warm, sheer pink-nude base, confident black dots, maybe five or six per nail, no more.
The empty space matters here. Let it breathe.
Bare cuticle edges show up clearly here, so take a minute to clean them first.
12. Dotted French Tips
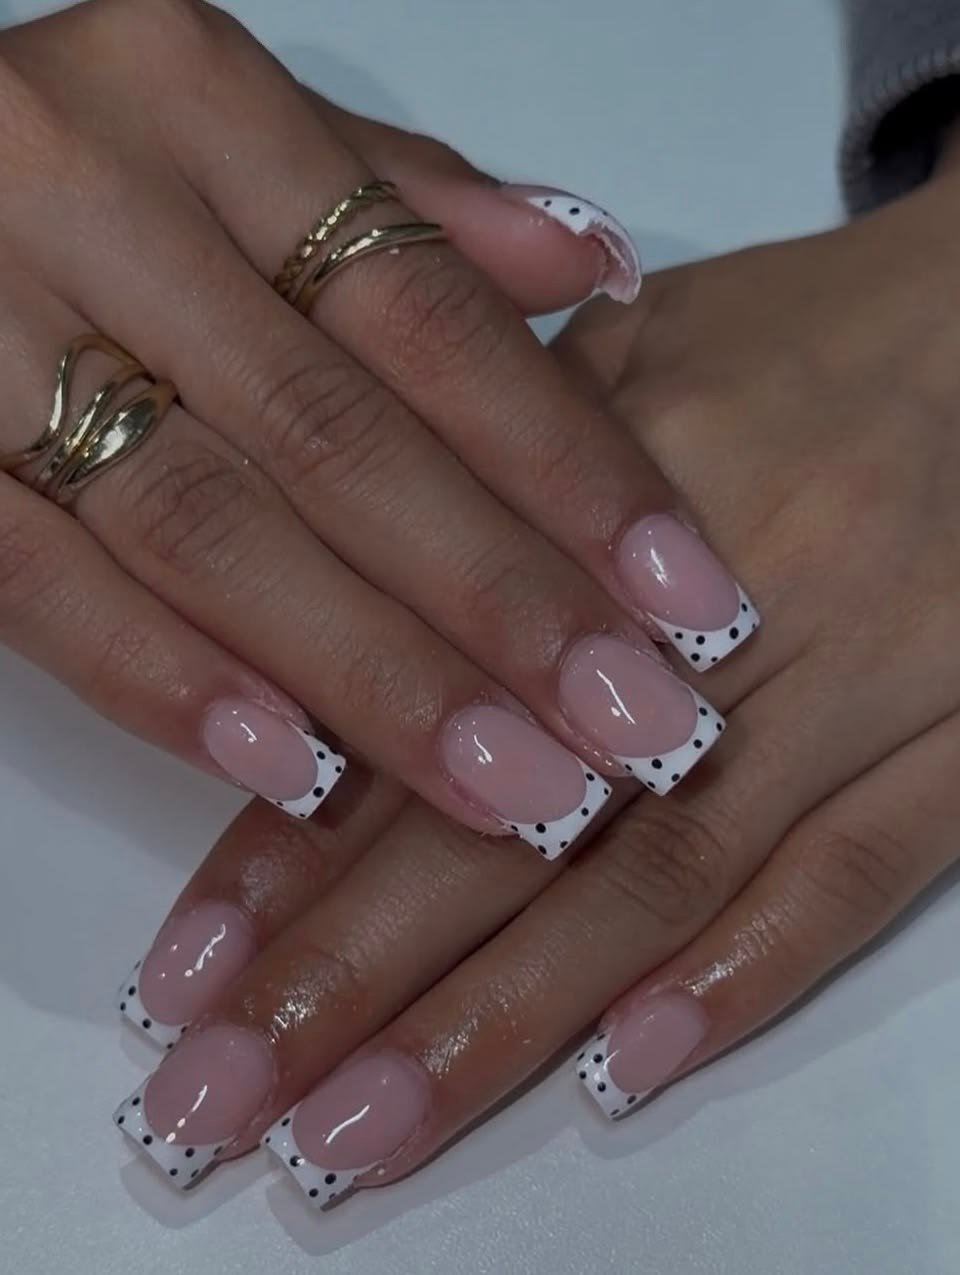
Keep your regular French tip, then dot the white edge with tiny black dots, or try soft pink or even lavender.
It’s a French manicure with a wink.
It works especially well on short square nails, where a plain French can feel flat.
Color-Pop Dots
Now we get louder. If your hands need attention, give it to them.
13. Rainbow Dots on White
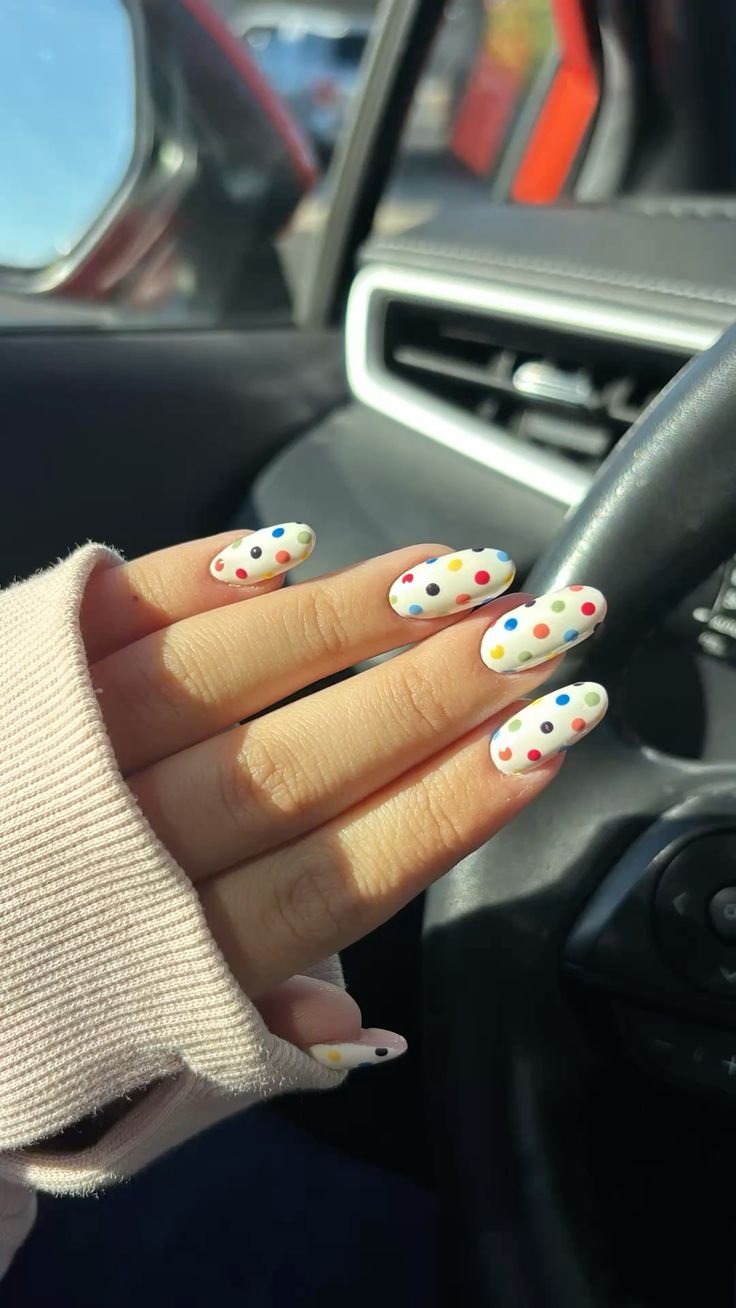
One dot per color, all over a clean white base.
Red, orange, yellow, green, blue, purple, in a random scatter. Don’t plan it too much.
Chaos is the charm. Space them wide, skip the ruler, and keep the dots one size for a tidy look, or mix sizes if the mood strikes.
A matte topcoat makes the colors look softer and a little retro.
14. Hot Pink on Orange
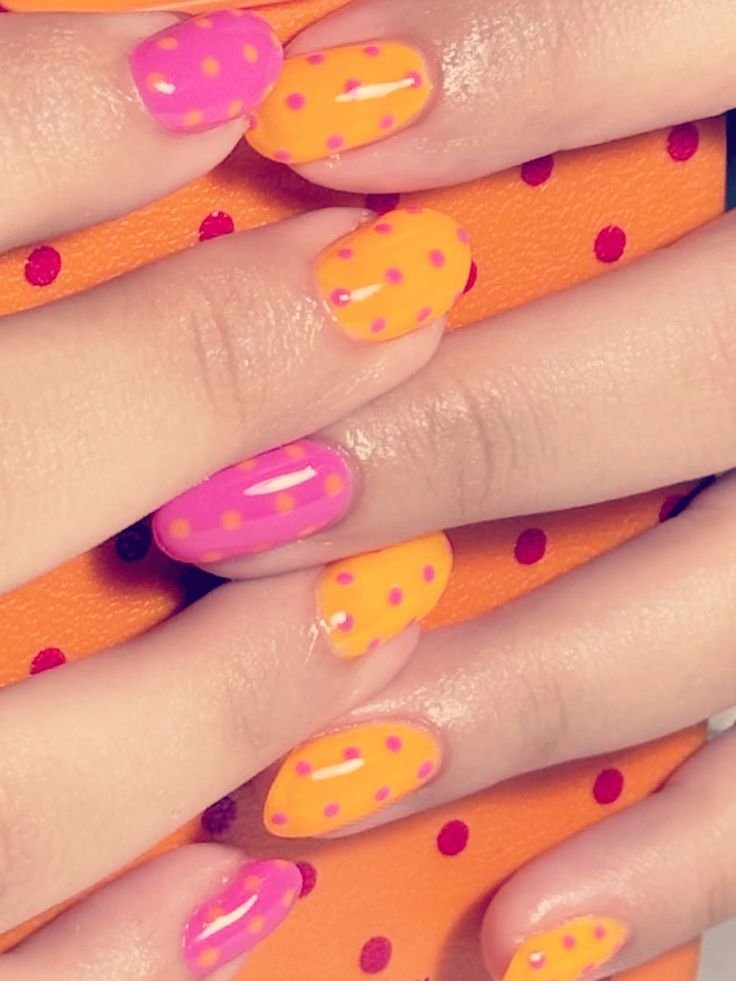
Yes, together. It sounds wrong, and it looks right.
A sunset-orange base with hot pink dots gives you a beach-trip energy that works in October too, honestly.
Warm tones glow against pale and deep skin alike, which makes this a flattering clash.
Flip it on alternating nails, with pink bases and orange dots, for a playful mix.
15. Sky Blue Dots on Butter Yellow
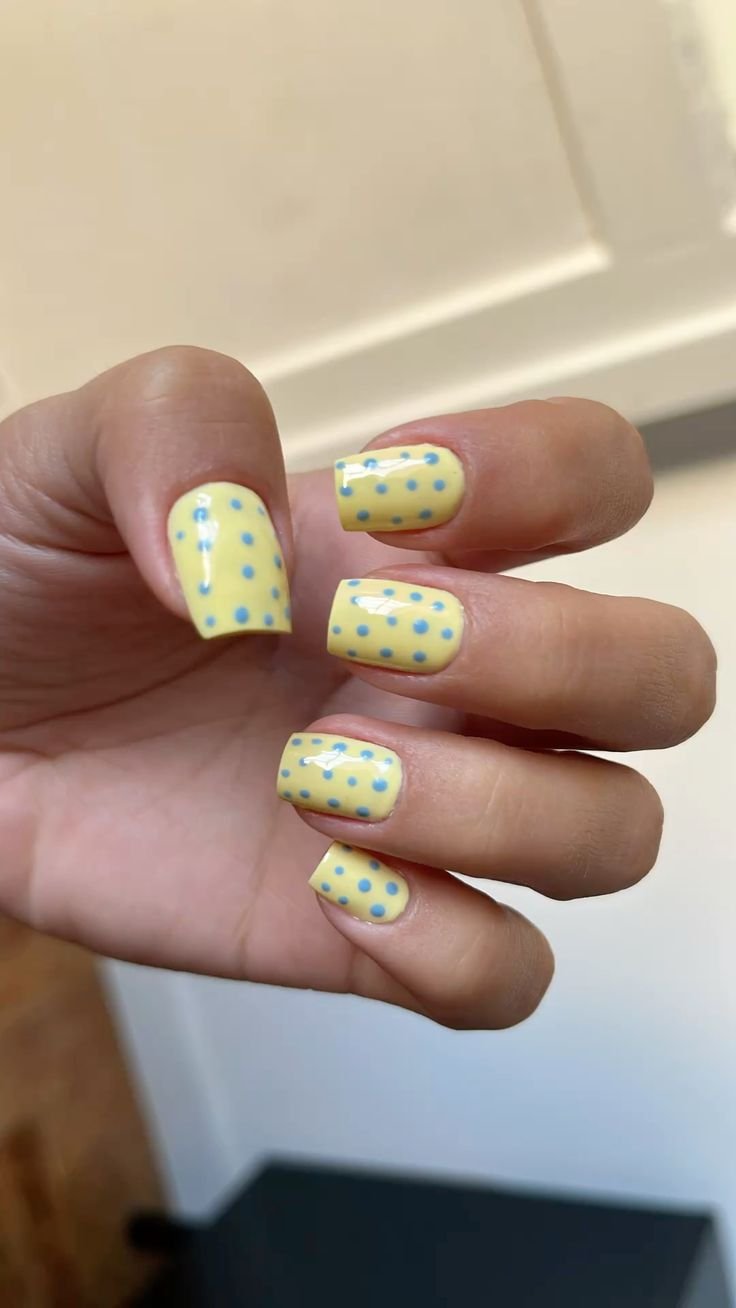
Butter yellow has been everywhere this year, and a soft sky blue makes it pop. Go bolder with cobalt if you want more punch.
The contrast is sharp but friendly. Try matte topcoat if you’re feeling brave.
Do the yellow in two thin coats first, so the blue doesn’t look patchy on top.
16. Lime Green on Lilac
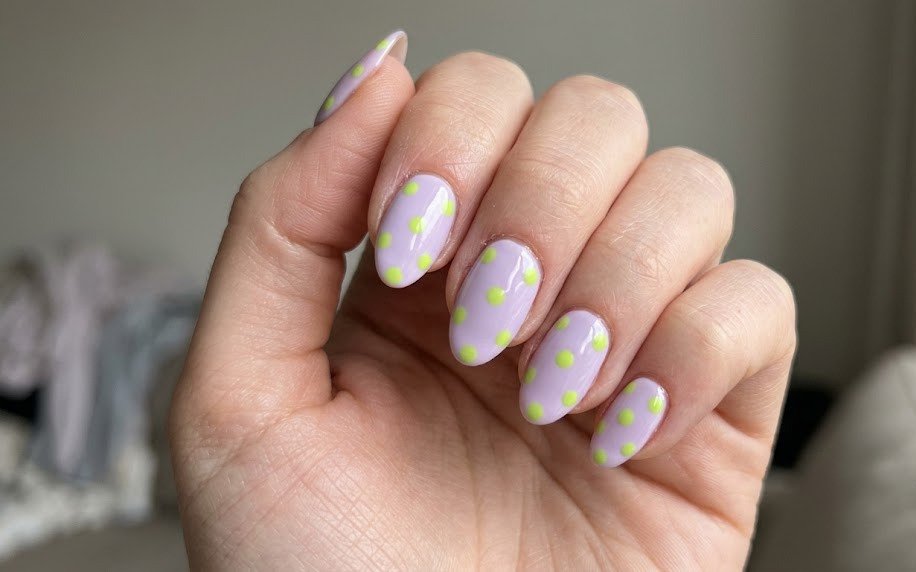
Pastel purple base, acid-green dots. It’s a little unhinged, in the best way.
Wear it when you want strangers to ask where you got your nails done.
Keep your outfit calm and let the color combo do the talking.
17. Mismatched Colors Per Finger
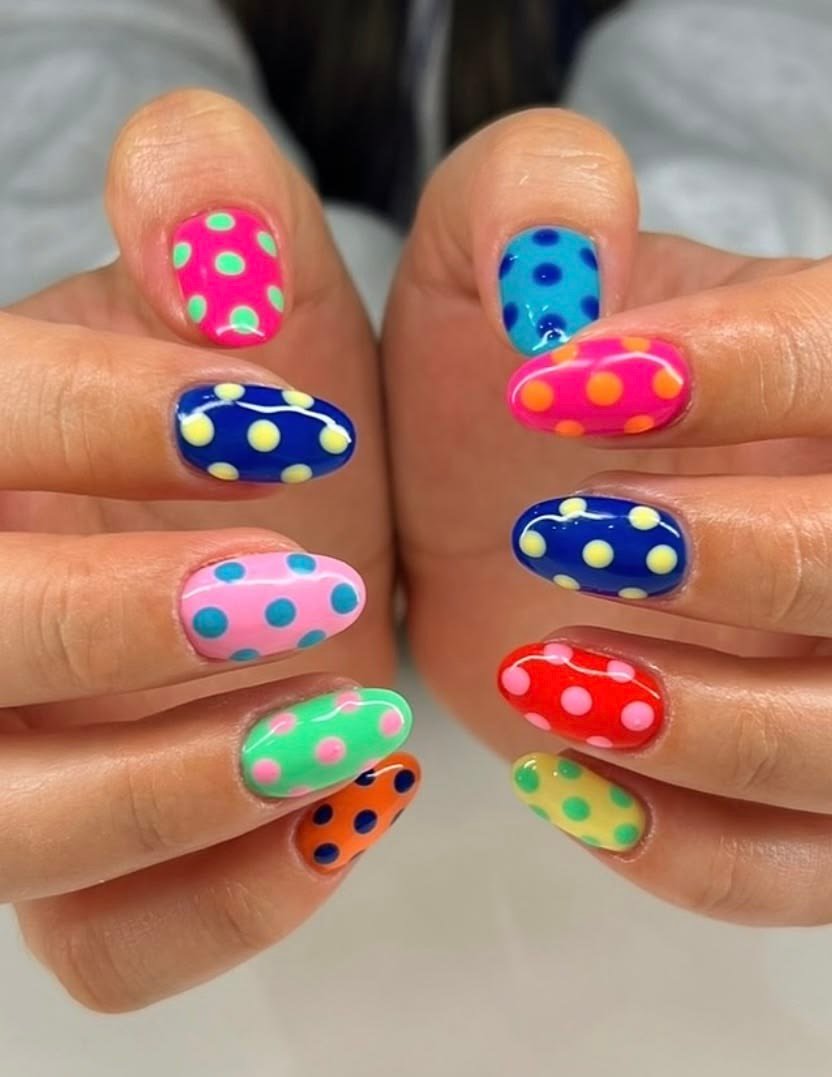
Each nail gets its own base and its own dot color.
hot pink with mint, navy with yellow, red with pink.
It looks like a candy shop spilled onto your hand.
Plan on about forty minutes, since each nail needs its own drying time.
18. Neon Dots on Black
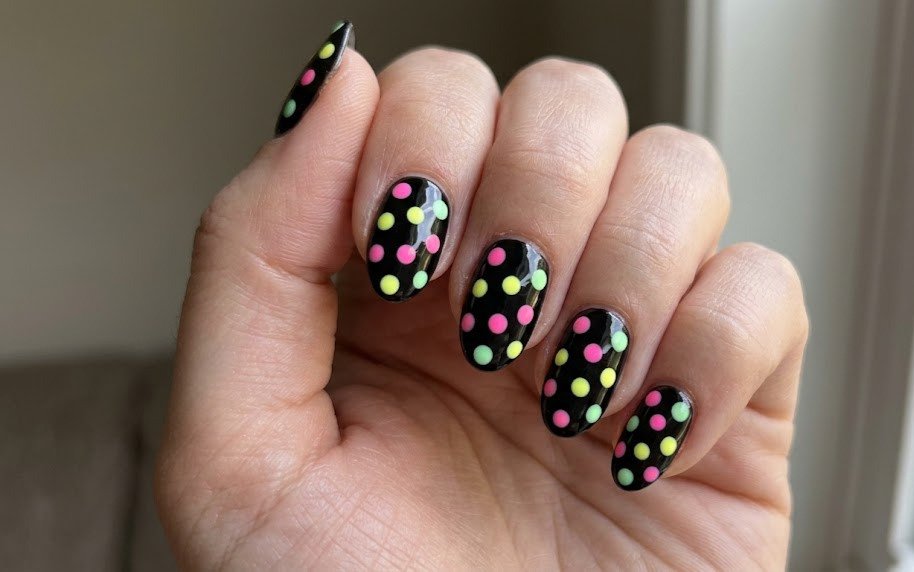
A glossy black base lets neon dots glow. Electric pink, lemon, mint. Hold your hand under a lamp and watch them hum.
Swap in orange dots and you’ve got an instant Halloween set.
Neon looks dull over thin black, so use a rich, opaque formula underneath.
Quite Dots
For people who say they don’t do nail art. (I used to be one of them.)
19. Single Dot Accent
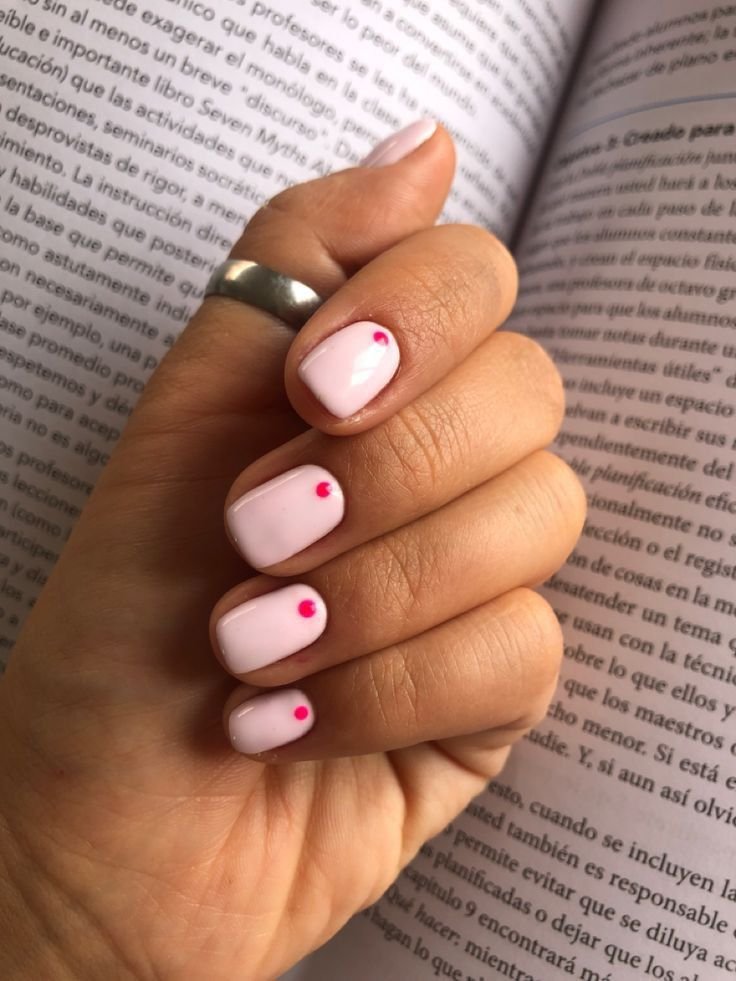
One tiny dot at the base of each nail, near the cuticle and slightly off-center.
That’s it. It’s a whisper of a design, and somehow people notice anyway.
Try it in white on a bare nail, in gold if you like a hint of shine, or in hot pink on a soft milky-pink base for a playful pop.
20. Sheer Jelly Base with Tiny Dots
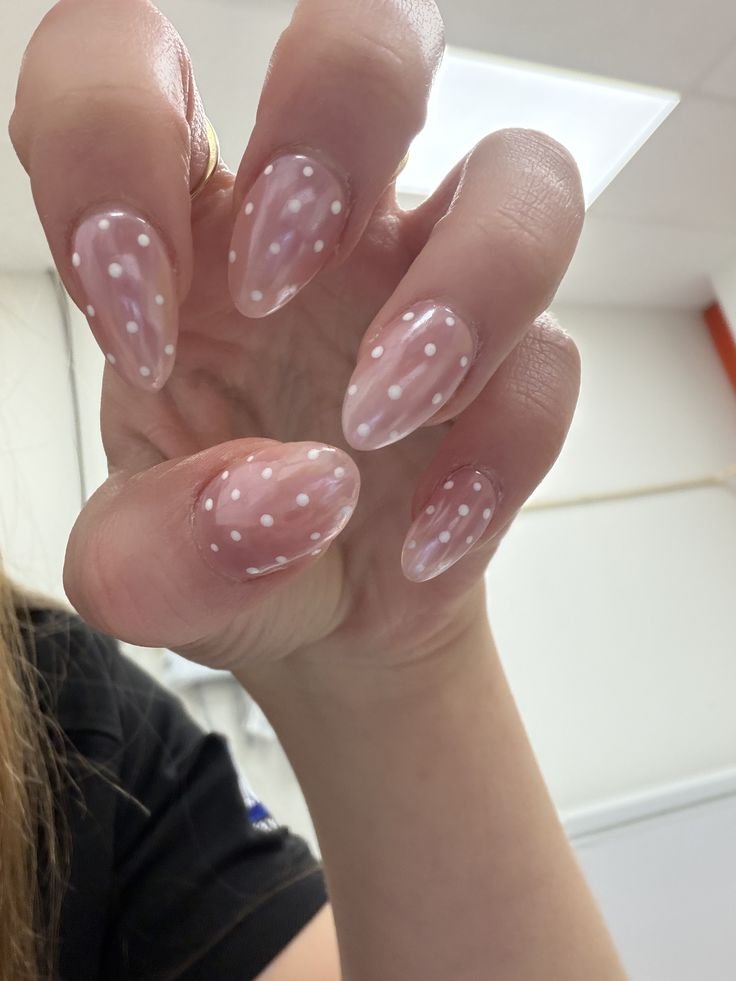
A translucent pink or peach jelly polish, then a sprinkle of tiny dots in white.
It looks like the nail itself is speckled.
Soft, glossy, very skin-adjacent. It’s forgiving, too, because the sheer base hides small wobbles in dot placement.
21. Dots on the Ring Finger Only
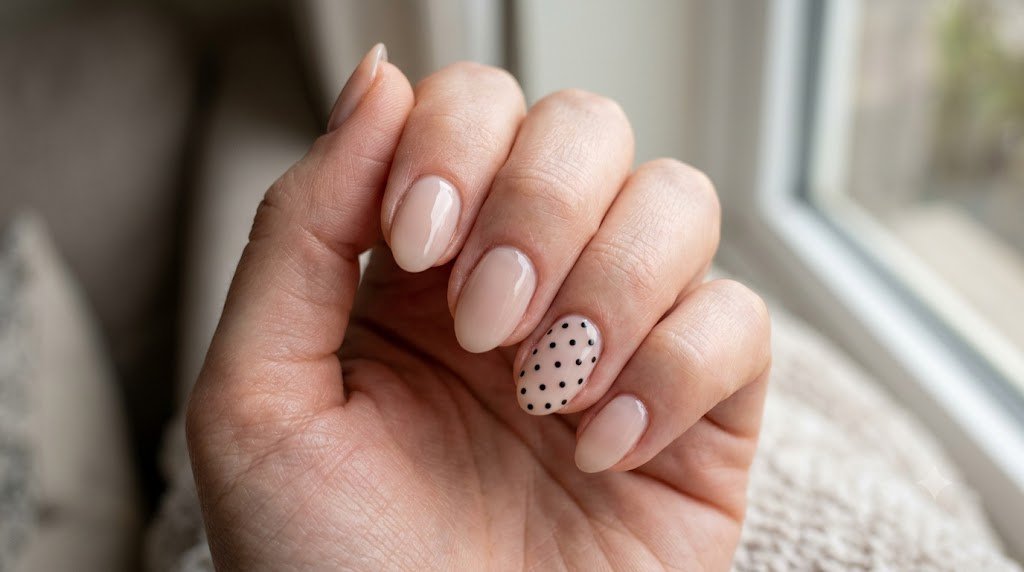
Plain polish on four nails, full polka dots on one.
It’s the easiest way to try the trend without committing your whole hand.
Pull the dot color from your favorite sweater, and it’ll look planned on purpose.
22. Cuticle Line Dots
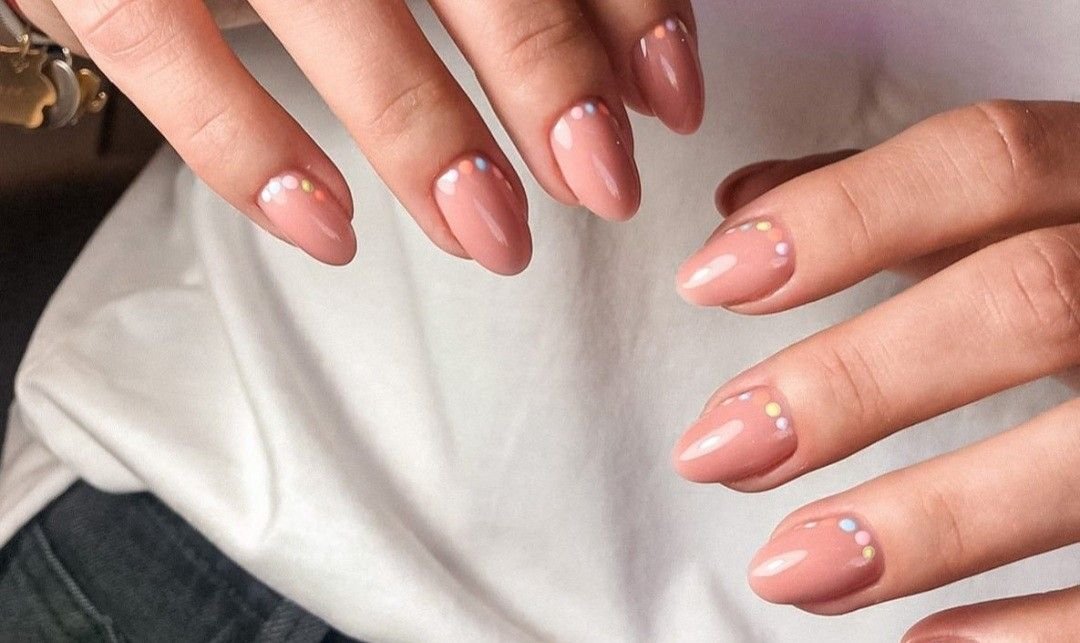
A tiny row of dots hugging the base of the nail, like a necklace for your cuticle.
Start with a glossy, warm nude, then use a fine dotting tool to place small pastel dots (white, butter yellow, baby blue, blush pink) along the curve at the cuticle.
You don’t have to go all the way around. A short arc in one corner looks just as good, and a little more casual. It’s tiny, tidy, and easy to wear to work.
It also grows out gracefully, so you can stretch the manicure an extra week.
23.Constellation Dots
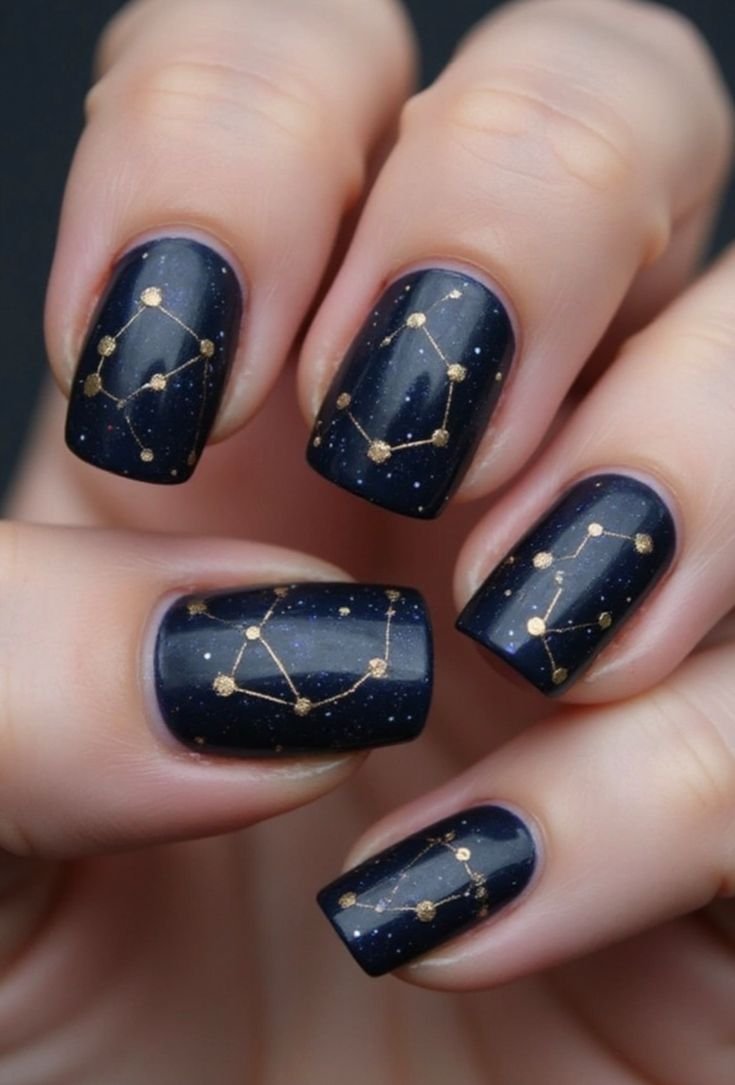
A night sky on your fingertips. Start with a deep navy polish, ideally one with a little fine shimmer, so it looks like it’s full of faraway stars.
Then place three to five small gold dots on each nail and join them with hair-thin gold lines, like a star map.
Don’t copy the same pattern on every nail. Each finger gets its own little constellation, and that’s what makes it feel personal.
24. Glossy Black Dots on Matte Black
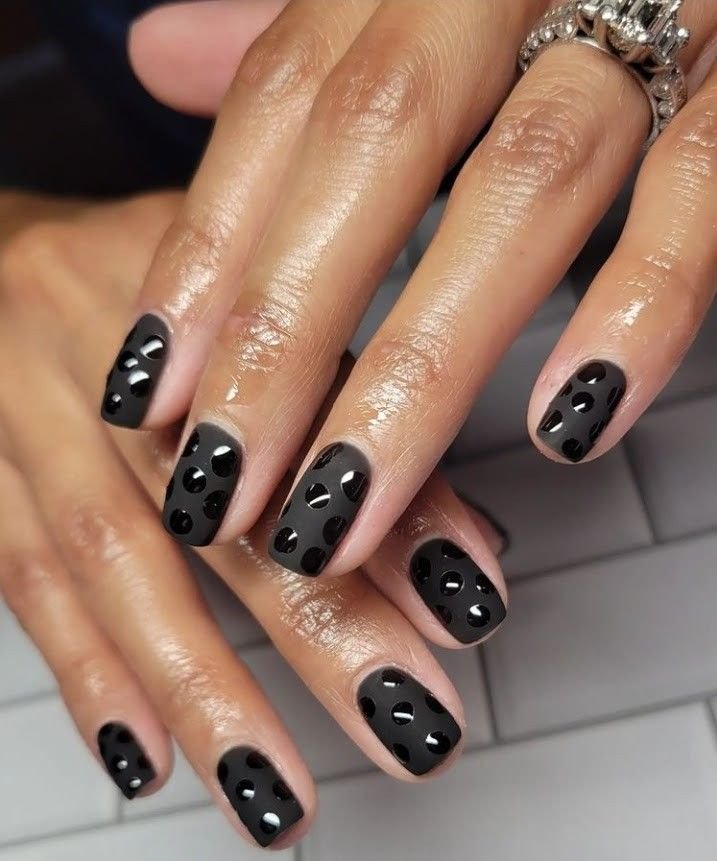
One color, two finishes. Paint your nails in a flat matte black, then add dots in regular glossy black polish on top.
From across the room it looks like plain black nails. Then you move your hand, the light catches the dots, and suddenly there’s a whole pattern.
It feels like velvet under a fingertip, with tiny shiny drops on top.
Dots with Effects and Textures
Same dots, different mood. Here they land on blurry gradients, stripes, and soft washes of color, and the contrast does the work. Crisp against fuzzy. Neat against messy. These look harder than they are.
25. Aura Nails with Dots
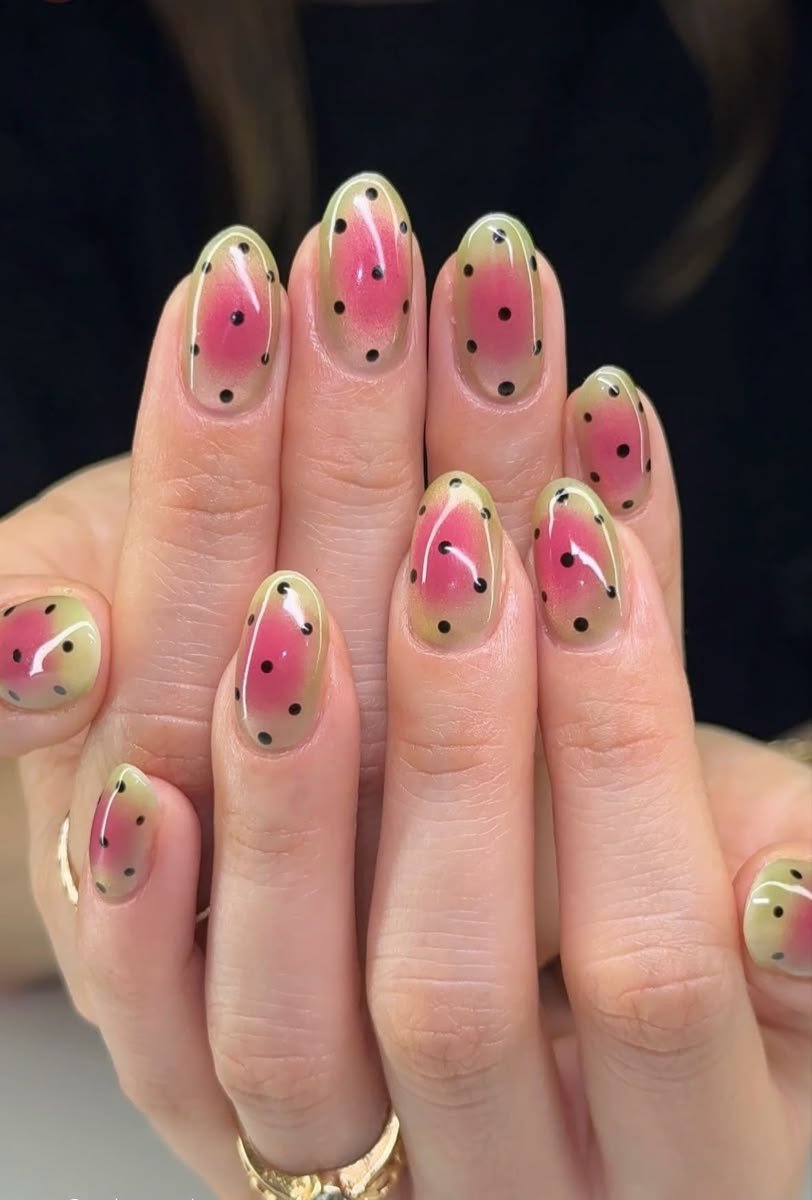
Fruit salad, but make it a manicure. Start with a pale lime-yellow jelly base, then dab a soft pink glow in the center of each nail with a makeup sponge and let the edges fade out.
Once it’s cured, dot tiny black seeds around the glow, evenly spaced and slightly off-grid.
The blurry color and sharp dots play off each other, and the glossy topcoat makes the whole thing look like a ripe slice.
26. Stripes and Dots
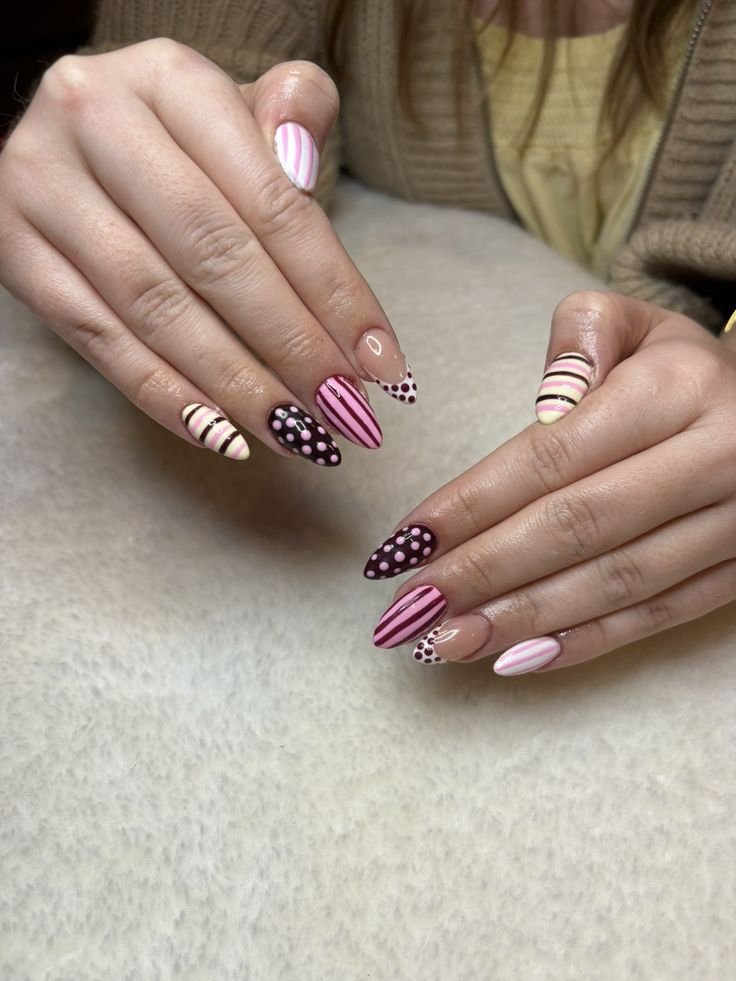
Ice cream, but on your nails. Pick three shades: chocolate brown, strawberry pink, and vanilla cream. Mix striped nails with dotted ones, so every finger gets a different pattern from the same palette.
Try pink dots on a chocolate base, thin brown stripes over cream, and wide pink stripes on white. On one or two nails, skip the full base and dot only the tip, French style, over a sheer nude.
Use a thin brush for the stripes, and don’t worry if a line wobbles. Almond nails give the stripes room to stretch.
27. Dots and Leopard Spots
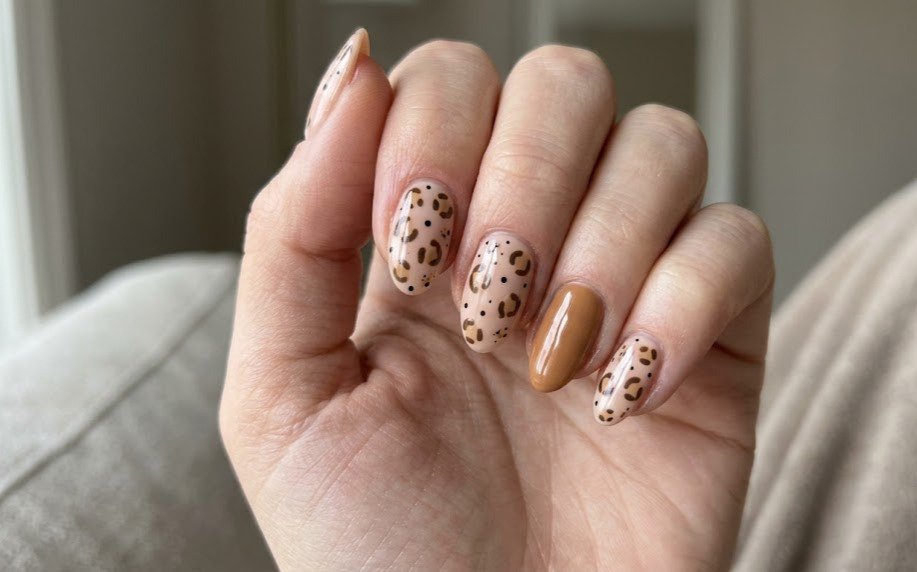 Layer small black polka dots between tan-and-brown leopard rosettes.
It sounds like too much, but when you keep the palette neutral it comes together.
Nude, caramel, and black are your three colors. It’s bold without being loud.
28. Dots with a Watercolor Wash
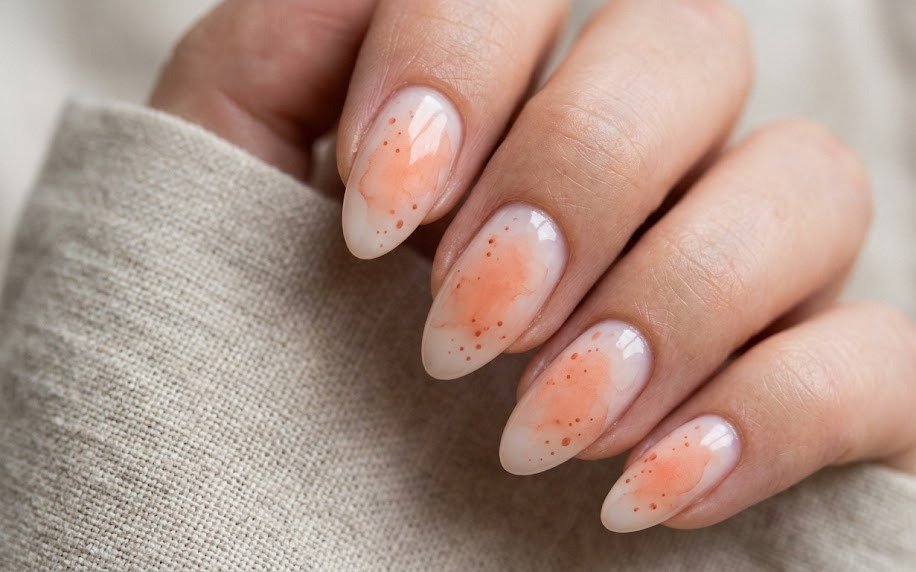
Brush a faint, see-through wash of color over the nail, then add tiny dots in a deeper shade of the same color.
It looks like paper that got a little wet.
Sheer inks or thinned gel polish give the best effect.
Soft, dreamy, and different every time.
Dots for the Seasons
Nails follow the calendar whether we plan for it or not.
These designs bring dots into spooky season and the snowy months, so you’ve got something ready when the weather (and your wardrobe) changes.
29.Dots and Ghosts for Halloween
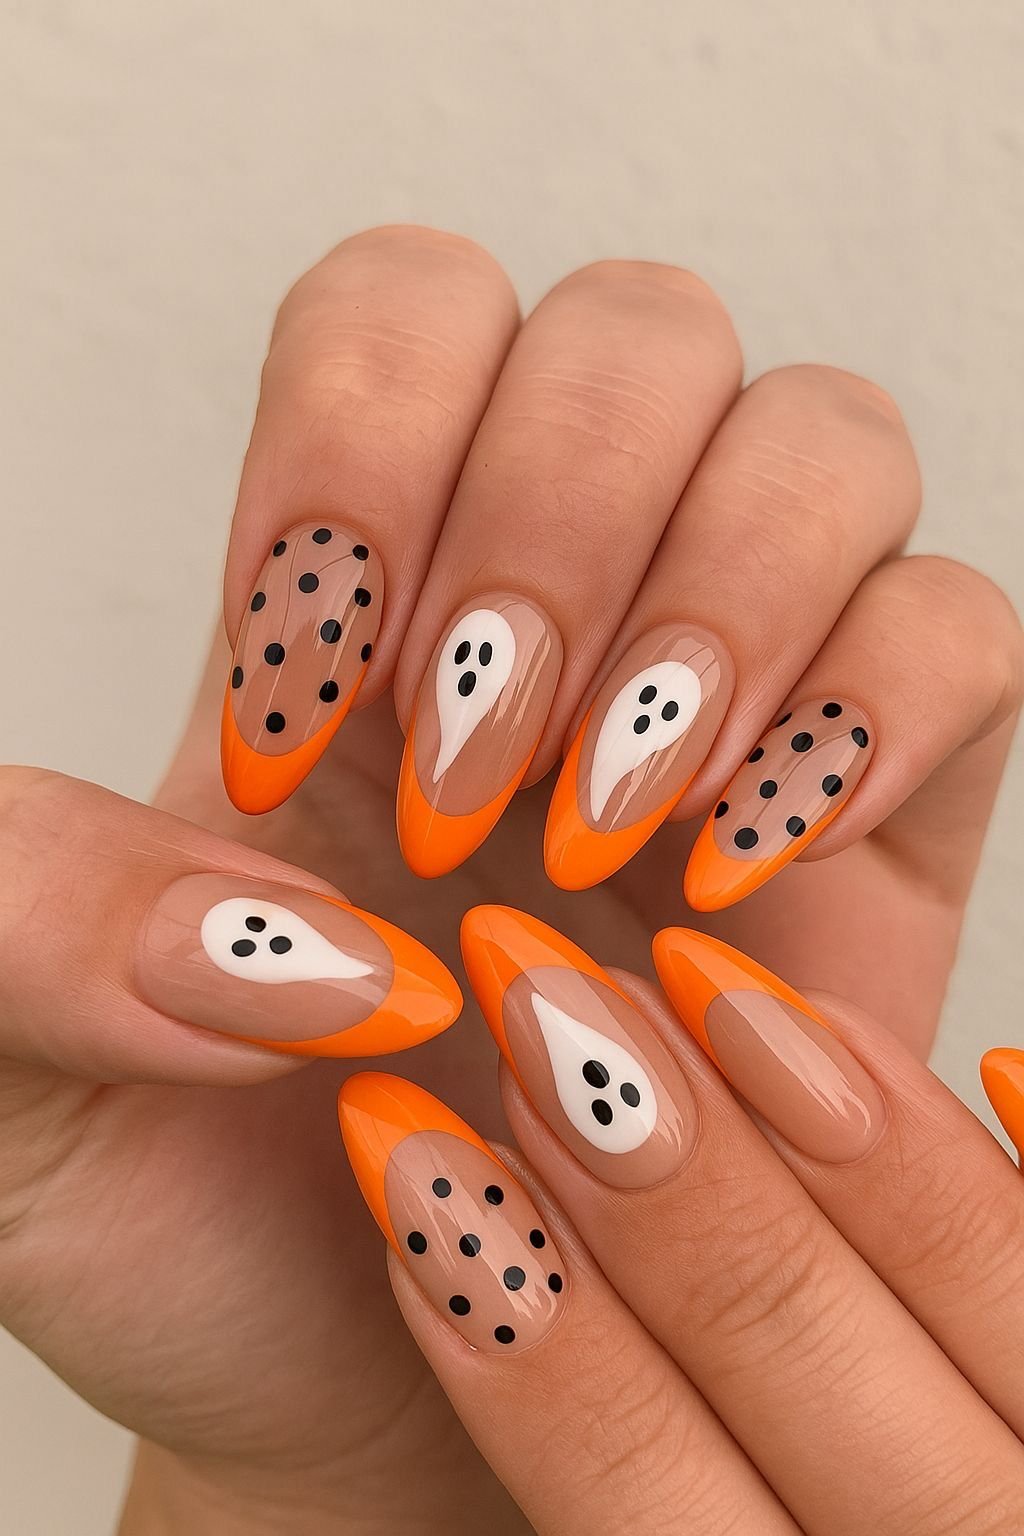
Spooky season, but make it cute. Start with a sheer nude base and paint a bold pumpkin-orange French tip on every nail.
Then mix two designs: small black dots scattered over some nails, and a friendly white ghost on the others.
The ghosts are just a rounded blob with a wavy tail and two or three black dots for a face, so the dots stay part of the story.
Almond nails give the ghosts plenty of room.
30. Dots and Snowflakes for Winter
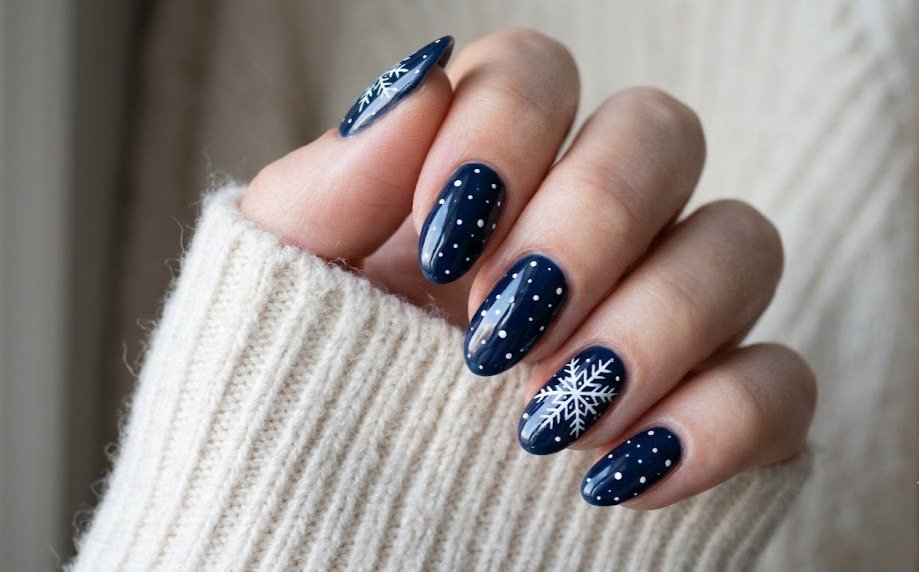
Deep navy or icy blue base, white dots scattered like falling snow, and one or two delicate snowflakes on the accent nails.
It’s calm and pretty, and you can wear it from December through February without anyone getting tired of it.
A Few Quick Tips Before You Start
Some things I wish someone had told me earlier.
First, your dotting tool matters less than your polish consistency. Thick polish makes round dots. Thin polish makes teardrops.
If your bottle’s gone goopy, add a drop of thinner and shake it, then test on a scrap of paper. Most drugstores sell polish thinner for a few bucks.
Second, work in small batches. Dot two nails, then move on. If you try to finish a whole hand, the first nails will dry and the last ones will smear. Painfully obvious, I know, but I still forget.
Third, clean your tool between colors. A quick wipe with acetone on a cotton pad does it. Otherwise you’ll end up with muddy dots, and muddy dots aren’t a vibe.
And last, seal everything. A good topcoat over polka dots smooths the tiny ridge each dot leaves behind. Cap the free edge too, running the brush along the tip, so the design doesn’t chip in three days.
Pick One and Just Go
Here’s the thing about polka dots. They’ve survived every trend cycle for a reason. They’re friendly, they’re flexible, and they never feel try-hard, even at their loudest.
So choose one idea from this list. Just one. Maybe it’s the single dot at the cuticle, maybe it’s the neon-on-black showstopper. Try it this weekend, see how it feels, and let the next design find you after that.
Your nails are tiny canvases. Dot them like you mean it.
Common Questions
Can I make polka dots without a dotting tool?
Yep. The rounded end of a bobby pin works great, and so does a toothpick, the tip of a pencil eraser, or even a makeup brush handle.
Dip, dab, lift straight up. Bigger tip, bigger dot. Practice a few on a plastic lid first so your hand knows what to expect.
How long do polka dot nails last?
Regular polish usually holds for five to seven days, sometimes longer with a good base coat and a topcoat.
Gel stretches that to about two or three weeks. Either way, cap the free edge and reapply topcoat every few days to keep the dots from chipping.